👤
1. Create Your Account
Sign up takes under 60 seconds. Choose email or single sign-on with Google or Microsoft.
1
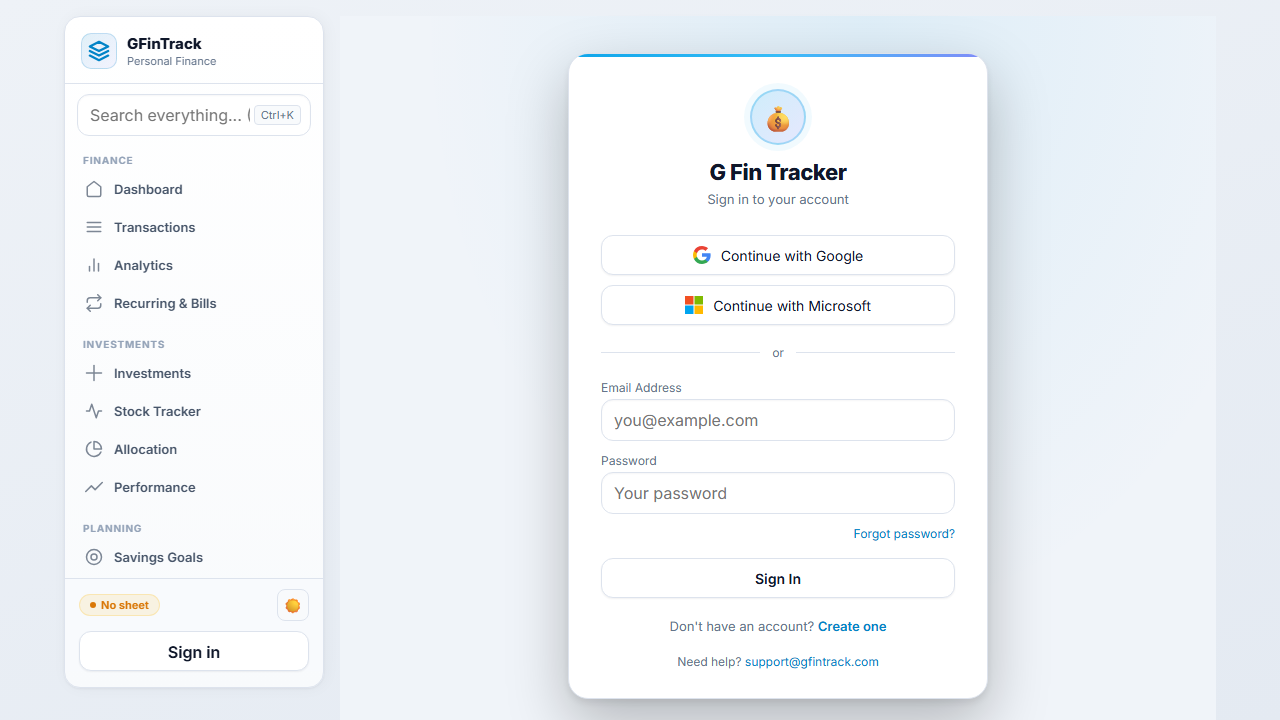
Go to gfintrack.com and click Sign In or Claim Free Access
You'll land on the sign-in/register screen.
2
Choose your sign-up method
🌐Continue with Google / Microsoft
Fastest — one click, no password needed
✉️Email & Password
Enter name, email, password (8+ chars)
3
Verify your email (email accounts only)
Check your inbox for a message from GFinTrack and click Confirm Email. Google/Microsoft sign-in skips this step automatically.
💡Google and Microsoft sign-in are the fastest option — no password to remember and your account is instantly verified.
Sign In screen

Create Account screen
🪄
2. The Onboarding Wizard
A 5-step setup that runs automatically after your first sign-in. Takes about 2 minutes.
1
Step 1 — Profile
Enter your name and an optional household label (e.g. "The Smiths"). This appears on your dashboard and reports.
2
Step 2 — Tax Profile
Select your federal filing status (Single, Married Jointly, etc.) and your state. The tax rate pre-fills — adjust only if your rate differs.
3
Step 3 — Connect Data
Link Google Sheets, OneDrive Excel, or choose to import a CSV after setup. You can skip this and connect later.
4
Step 4 — Modules
Toggle on the feature groups you want: Investments, Budgeting, Analytics, Tax Center. Core features (Dashboard, Transactions) are always included.
5
Step 5 — Done!
Review your profile summary and click Go to Dashboard.
💡All onboarding settings can be changed later in Settings — don't worry about getting everything perfect on the first run.
🔗
Connect Your Data
Link cloud storage or import your data
Microsoft
OneDrive · Excel
The onboarding wizard — Step 3 (Connect Data) shown
📥
3. Get Your Data In
GFinTrack needs transaction data to show insights. Three ways to load it — pick the one that fits you.
📤 Import CSV from your bankEasiest for most people
- Log in to your bank's website
- Find Export or Download Transactions (usually under Statements or Account Activity)
- Download as CSV (not PDF)
- In GFinTrack: Transactions → Import → drag and drop the file
- Map the columns if prompted: Date · Description · Amount
☁️ Connect Google SheetsBest for live sync
- Sidebar → Connect Sheet
- Click Authorise with Google
- Paste your Google Sheet URL into the field
- GFinTrack syncs automatically every 6 hours
- Your data stays in your Google Drive — we only read it
📝 Add transactions manuallyNo import needed
- Sidebar → Transactions
- Click + Add Transaction
- Enter Date, Description, Amount, Category, and Type (Income / Expense)
- Repeat for each transaction
GFinTrack
Personal Finance
🏠Dashboard
💳Transactions
📊Analytics
📈Investments
🎯Savings Goals
🏛️Tax Center
🏡Family View
⚙️Settings
Import Transactions
📤
Drag & drop your CSV
or click to browse files
Choose File
Supports Chase · Bank of America · Wells Fargo · Citi · and 100+ others
Transactions → Import — drag and drop your bank CSV
📊
4. Your Dashboard
Your financial command centre — everything at a glance the moment you log in.
💰
Combined Income
Total money in this month
💸
Total Spending
All expenses this month
📈
Net Savings
Income minus spending
1
Three headline cards at the top
Income · Spending · Net Savings — all for the current month. Green = income, red = expense.
2
Spending trend chart
A bar chart showing your daily or monthly spending pattern so you can spot unusual weeks.
3
Top spending categories
Your highest-spend categories ranked — instantly shows where money is going.
4
Recent transactions
The last 10–20 transactions across all accounts, newest first.
GFinTrack
Personal Finance
🏠Dashboard
💳Transactions
📊Analytics
📈Investments
🎯Savings Goals
🏛️Tax Center
🏡Family View
⚙️Settings
Dashboard — May 2026
Monthly spending trend
Dashboard — stat cards, spending trend, and sidebar navigation
💳
5. Transactions
Your complete financial ledger. Every income and expense entry lives here.
1
Browse and search
Use the search bar to find any transaction by name. Filter by date range, category, or type (income/expense).
2
Add a transaction manually
Click + Add Transaction → fill in Date, Description, Amount, Category, Type → Save.
3
Edit or delete
Click any row to edit it. Select multiple rows with the checkbox to bulk-categorise or delete.
4
Auto-categorise with Rules
Go to Rules in the sidebar to set up auto-tagging. Example: any transaction containing "NETFLIX" automatically gets category Subscriptions.
💡Export your transactions at any time — use Settings → Account → Export My Data to download a full Excel workbook.
GFinTrack
Personal Finance
🏠Dashboard
💳Transactions
📊Analytics
📈Investments
🎯Savings Goals
🏛️Tax Center
🏡Family View
⚙️Settings
| Date | Description | Category | Amount |
|---|
| May 18 | Whole Foods Market | Groceries | -$84 |
| May 17 | Direct Deposit | Income | +$2,700 |
| May 16 | Netflix | Subscriptions | -$16 |
| May 15 | Shell Gas Station | Transport | -$52 |
| May 14 | Amazon.com | Shopping | -$38 |
Transactions list — searchable, filterable, with category tags and type colour coding
🎯
6. Budgets
Envelope budgeting — set a monthly spending limit per category and track it in real time.
1
Open Budgets from the sidebar
You'll see all your budget envelopes for the current month.
2
Create a budget envelope
Click + New Budget → choose a category (e.g. Groceries) → set your monthly limit (e.g. $400).
3
Read the progress bars
Green — under budget. You have room to spend. Amber — approaching your limit (>85% used). Red — over budget. You've exceeded your envelope. 4
GFinTrack updates balances automatically
Every time a new transaction is imported or added, your budget bars update instantly.
GFinTrack
Personal Finance
🏠Dashboard
💳Transactions
📊Analytics
📈Investments
🎯Savings Goals
🏛️Tax Center
🏡Family View
⚙️Settings
Budget envelopes — colour-coded progress bars show under, near, and over limit
📈
7. Investments
Track your entire portfolio in one place — stocks, ETFs, and mutual funds with live prices.
1
Add your holdings
Sidebar → Investments (or Stock Holdings) → + Add Holding → enter ticker symbol, number of shares, and purchase price.
2
Live portfolio value
GFinTrack pulls real-time prices and calculates your current portfolio value, day gain, and total return automatically.
3
Sub-pages to explore
🥧Allocation
Pie chart of how your portfolio is distributed
📉Performance
Return over time vs benchmark
💰Realized P&L
Gains/losses from sold positions for tax
📰News
Latest news for your holdings
GFinTrack
Personal Finance
🏠Dashboard
💳Transactions
📊Analytics
📈Investments
🎯Savings Goals
🏛️Tax Center
🏡Family View
⚙️Settings
Investments — portfolio value, day gain, holdings list with live prices
🏆
8. Savings Goals & Net Worth
Set financial targets and track your overall wealth over time.
🎯 Savings Goals
1
Create a goal
Sidebar → Savings Goals → + New Goal → enter name, target amount, and target date.
2
Track progress
A progress bar shows how close you are. GFinTrack calculates how much you need to save per month to hit your date.
3
Mark contributions
Tag a transaction as a goal contribution to automatically advance your progress bar.
📉 Net Worth
1
Add assets
Savings accounts, investments, property, vehicles — anything you own with a value.
2
Add liabilities
Mortgage, car loan, student loans, credit card balance — anything you owe.
3
Watch it trend
GFinTrack charts your net worth month-over-month so you can see your wealth growing.
GFinTrack
Personal Finance
🏠Dashboard
💳Transactions
📊Analytics
📈Investments
🎯Savings Goals
🏛️Tax Center
🏡Family View
⚙️Settings
Savings Goals
🛡️Emergency Fund65%
$6,500 savedGoal: $10,000
✈️Vacation40%
$1,200 savedGoal: $3,000
🚗New Car24%
$4,800 savedGoal: $20,000
Savings Goals — visual progress bar with current vs target amount
🏛️
9. Tax Center
Every tax tool you need in one place — deductions, capital gains, quarterly payments, and more.
💡Start by tagging deductible transactions throughout the year. When tax season arrives everything is already organised — no frantic searching through receipts.
🏠
10. Family / Household Sharing
Invite family members to share a combined view of household spending, income, and budgets.
As the Household Owner
1
Create a household
Settings → Household → enter a name (e.g. "The Smiths") → Create Household.
2
Invite family members
Enter their email → Send Invite. They'll receive a branded email with an Accept button.
3
Manage members
View all members, cancel pending invites, or remove members from the same screen.
As an Invited Member
1
Open the invite email
Click Accept Invite in the email. You'll be taken to a preview page showing the household name and who invited you.
2
Sign in and accept
Sign in (or create a free account) → click Accept Invite. You're added instantly.
3
View the family dashboard
Sidebar → Family View — see combined income, spending, and per-member breakdowns.
💡Each member's personal transactions stay private. The Family View is a read-only combined summary — no one can see another person's individual entries.
GFinTrack
Personal Finance
🏠Dashboard
💳Transactions
📊Analytics
📈Investments
🎯Savings Goals
🏛️Tax Center
🏡Family View
⚙️Settings
🏠The SmithsMay 2026 · 2 members
Member Spending
Family View — combined household totals, per-member spending bars, and recent transactions
🛡️
11. Security & Two-Factor Authentication
Protect your account with MFA — a second code required at every sign-in.
1
Open Security settings
Settings → Security (in the left nav).
2
Enable Two-Factor Authentication
Click Enable Two-Factor Authentication. A QR code will appear.
3
Scan the QR code
Open your authenticator app (Google Authenticator, Authy, 1Password, etc.) → scan the QR code → it adds GFinTrack to your app.
Can't scan? Use the manual key shown under the QR code instead.
4
Enter the verification code
Type the 6-digit code from your authenticator app → click Verify & Enable.
5
Save your backup codes
8 one-time backup codes are shown. Save them somewhere safe (password manager, printed paper). These let you get back in if you lose your phone.
6
Trusted devices (optional)
At the MFA challenge screen, check "Remember this device for 30 days" on devices you use daily to skip the code for 30 days on that device.
⚠️Never share your backup codes. If you lose both your phone and your backup codes, account recovery requires contacting support.
GFinTrack
Personal Finance
🏠Dashboard
💳Transactions
📊Analytics
📈Investments
🎯Savings Goals
🏛️Tax Center
🏡Family View
⚙️Settings
Settings → Security
🔐Two-Factor AuthenticationENABLED
Every sign-in requires your password + a code from your authenticator app.
Scan with authenticator app
Google Authenticator, Authy, 1Password
Settings → Security — 2FA enabled status and QR code setup
⚙️
12. Settings Reference
Everything you can customise — profile, tax, modules, security, household, and account.
👤Profile
Update your name, household label, and avatar
🧾Tax Profile
Change filing status, state, and income tax rate used by the Tax Center
🧩Modules
Toggle feature groups (Investments, Budgeting, Analytics, Tax) on/off to keep your sidebar clean
🔒Password
Change your login password (email accounts only)
🛡️Security
Manage 2FA, view your last 10 sign-ins, and review 20 recent security events
🏠Household
Create or manage your family household, invite members, cancel pending invites
⚙️Account
Export all your data as Excel, sign out all devices, or permanently delete your account
8
Owners
Manage your portfolio owner labels — add custom names, rename existing ones, or remove unused labels. Changes apply instantly across Transactions, Investments, and Rules.
GFinTrack
Personal Finance
🏠Dashboard
💳Transactions
📊Analytics
📈Investments
🎯Savings Goals
🏛️Tax Center
🏡Family View
⚙️Settings
👤Profile
🧾Tax
🧩Modules
🔒Password
🛡️Security
🏠Household
⚙️Account
Settings — left nav with 7 sections, Profile panel shown
👥
Portfolio Owners
Define who owns accounts and investments — Self, Spouse/Partner, Joint, or any custom label. Owner names appear across Transactions, Investments, and Rules.
1
Open Settings → Owners
Navigate to Settings using the ⚙️ icon in the sidebar, then click Owners in the left navigation. You will see your current owner list — new accounts start with Self, Spouse/Partner, and Joint pre-loaded.
2
Add a new owner
Type a name in the Add Owner field at the bottom of the list and click Add Owner. The name appears immediately and is available in all dropdowns and datalists across the app.
3
Rename an owner
Click any existing owner name to edit it inline. Press Enter to save or Escape to cancel. The updated name is reflected everywhere it appears.
4
Remove an owner
Click Remove next to any owner. Note: you must keep at least one owner — the Remove button is disabled when only one remains.
5
Using owners in Transactions
When adding or editing a transaction, type in the Owner field — your defined owners appear as suggestions in the dropdown. The Owner filter on the Transactions page also updates automatically.
6
Using owners in Investments
When adding an investment transaction, the Owner field shows your defined owners as autocomplete suggestions. The Owner filter on the Investments page pulls from the same list.
💡Owner names sync instantly — no page refresh needed. Any owner you add in Settings is available everywhere in the app within seconds.
📉
Stocks & Watchlist
Track any stock with live quotes, analyst signals, RSI indicators, price alerts, and Sharia compliance screening — all in one place.
1
Navigate to Stocks
Open Stocks from the bottom navigation bar or sidebar. The page has two tabs: Holdings (your portfolio positions from imported transactions) and Watchlist (stocks you want to monitor).
2
Add a stock to your Watchlist
On the Watchlist tab, type any ticker symbol (e.g. AAPL, MSFT, TSLA) in the search box and press Add. The card appears immediately with a live quote, 30-day sparkline chart, and key metrics.
3
Reading the signal cards
Each watchlist card shows two side-by-side signal panels — 📊 Fundamental (long-term: analyst target vs current price, upside %, consensus rating) and 📈 Technical (short-term: RSI(14) with oversold/neutral/overbought zones). A combined 💡 insight appears when both signals align.
4
Analyst target range
The target range bar shows Bear / Mean / Bull analyst price targets with the current price marked. Upside % and analyst count are displayed below. Green means the stock is trading below the mean target.
5
Set a price alert
Click the 🔔 bell icon on any watchlist card. Enter a target price and choose Above or Below — you will receive an email notification when the price crosses your threshold.
6
Earnings countdown
Each card shows the next (or most recent) earnings date with a days-remaining badge. Use this to avoid entering a position just before a high-volatility earnings event.
7
Portfolio overlap
If you already own shares of a watchlisted stock, a badge shows your current holding size and market value — so you can see context without switching to the Holdings tab.
8
Sharia compliance screening
Cards for 130+ pre-screened tickers show a Halal / Review / Not Screened badge. The app checks the live debt-to-market-cap ratio against the 33% AAOIFI threshold and flags stocks that exceed it.
9
Add inline notes
Click the notes icon on any watchlist card to add a personal research note (thesis, target, reminder). Notes are saved to your account and visible only to you.
10
View your Stock Holdings
Switch to the Holdings tab to see all positions derived from your imported stock transactions — quantity, average cost, current market value, unrealized P&L, and allocation breakdown.
💡Price data refreshes automatically when you load the page. Click the Refresh button on any card to force an immediate quote update for that ticker.
🤖
AI Assistant
Ask questions about your finances in plain English and get instant answers grounded in your actual data — powered by a free AI model.
1
Find the assistant
Click the 🤖 button fixed in the bottom-right corner of any page, or navigate to AI Assistant in the Finance section of the sidebar.
2
Ask a question
Type any finance question in the input box and press Enter or click Send. Examples: "What did I spend on dining last month?", "Am I over budget this month?", "What are my top spending categories?", "How can I save more?"
3
Read the streamed answer
Responses stream in word-by-word in real time. The assistant uses a 3-month snapshot of your actual transaction data, top categories, payees, income/expense trend, and savings goals to ground its answers in your real numbers.
4
Use suggested questions
When you open the assistant for the first time, four starter questions appear as clickable cards. Tap one to send it instantly without typing.
5
Daily usage limit
The assistant allows 50 questions per day, which resets at midnight. This is far more than typical daily usage — you will rarely hit it.
💡The assistant sees your financial summary, not your raw transactions — your data stays private. It works best for questions about trends, totals, and budgets. For specific transaction lookups, use the Transactions page search.
⚡
Bulk AI Categorization
Automatically categorize all your uncategorized transactions in one click using your own payee history and smart keyword matching.
1
Find the panel
Navigate to Transactions. If you have any transactions with no category (blank, 'Uncategorized', or 'Other'), a banner appears above the transaction table: "⚡ X transactions have no category — Auto-categorize →". If all transactions are categorized, the panel is hidden.
2
Run the preview
Click the Auto-categorize button. The system scans your transaction history and runs a dry-run preview — nothing is saved yet. You'll see a summary: how many will be applied automatically and how many need your review.
3
Understand confidence levels
High confidence (auto-apply): the same payee appears 5+ times in your history with the same category 80%+ of the time. Medium confidence (review queue): payee matches a known keyword pattern (Netflix → Entertainment, Shell → Gas, etc.) but needs confirmation.
4
Review medium-confidence suggestions
The review queue shows a table with each payee, the suggested category, and Accept / Skip buttons. Accept the ones that look right, skip the ones that don't.
5
Apply
Click 'Apply high-confidence' to auto-apply only the safe matches, or 'Apply all' to apply everything you accepted. A confirmation banner shows how many categories were saved.
💡Run Bulk Categorization after each import to keep your transaction data clean. The more transactions you have, the more accurate the high-confidence matches become — the system learns from your own history.
💰
Fee Analyzer
Understand the true cost of your investments — both trading commissions and the hidden annual drag from fund expense ratios.
1
Navigate to Fee Analyzer
Click Fee Analyzer in the Planning section of the sidebar, or go to /fee-analyzer.
2
Trading Costs section
The top section shows your actual trading commissions paid, pulled from your investment transaction history. Four KPI cards show: Total Fees Paid, Average Per Trade, Number of Trades, and Fees as % of Portfolio. A bar chart breaks fees down by symbol.
3
Fund Expense Drag section
The lower section shows the annual cost of holding ETFs and mutual funds. 45 popular tickers (SPY, VOO, QQQ, ARKK, GLD etc.) are pre-seeded with their real expense ratios. The estimated annual drag = market value × expense ratio.
4
Edit an expense ratio
For holdings not in the pre-seeded list, or to update a ratio, click the expense ratio field on any row and type the correct value (e.g. 0.0035 for 0.35%). Click away to save. The badge changes from 'lookup' to 'custom'.
5
Interpret the results
Compare the Total Drag figure against the industry average. A diversified portfolio of low-cost index funds (VOO, VTI) should have < 0.1% total drag. High-cost actively managed funds (ARKK = 0.75%) can cost hundreds of dollars per year on modest holdings.
💡The fee analyzer doesn't require any special setup — it reads your existing investment transaction history automatically. The more investment transactions you have imported, the more accurate the trading fee totals will be.
🌍
Multi-Currency Support
Record transactions in any of 25 supported currencies and see amounts formatted correctly. Exchange rates refresh automatically every day.
1
Set your home currency
Go to Settings → Profile. A Home Currency dropdown appears below the Household Name field. Select your primary currency (e.g. GBP, EUR, CAD). This is used as your default display currency.
2
Add a transaction in a different currency
When adding a transaction manually, a Currency field appears in the form (after the Owner field). Select the currency — it defaults to USD but can be changed to any of 25 supported currencies.
3
See currency badges
In the transaction table, any transaction recorded in a non-USD currency shows a small colored badge with the currency code (e.g. EUR, GBP) next to the payee name.
4
Exchange rate updates
Exchange rates are fetched from a free public API every day at 1 AM and cached. You never need to manage rates manually.
💡Multi-currency is opt-in — if you only use USD, nothing changes in your existing transactions or views. Currency badges only appear on non-USD rows.
📐
Planning Tools
A suite of forward-looking financial planning features to help you understand where you're headed — not just where you've been.
1
Cash Flow Forecast (/cashflow)
See your projected balance for the next 30, 60, and 90 days based on your recurring transactions. A line chart shows the daily balance curve. Upcoming bills and income are listed below.
2
Financial Health Score (/financial-health)
A composite 0–100 score across 5 pillars: savings rate, budget adherence, emergency fund coverage, investment contribution rate, and spending trend. Each pillar has a progress bar and a plain-English improvement suggestion.
3
Retirement Projection (/retirement-planning)
Enter your current age, target retirement age, current savings, and monthly contribution. A dual-area chart projects your portfolio to retirement. Shows whether you're on track using the 25× rule, and the sustainable monthly withdrawal using the 4% rule.
4
What-If Scenarios (/scenarios)
Model three types of scenarios side-by-side vs your baseline: extra debt payments (how much faster will you be debt-free?), increased retirement contributions (how much more will you have at retirement?), and savings goal acceleration (how much sooner will you reach your goal?).
5
Savings Rate Dashboard (/savings-rate)
Track your monthly savings rate over time as a percentage of income. A 20% target line is shown for reference. An emergency fund arc gauge shows how many months of expenses your current savings cover.
💡All planning tools work with the data you've already imported — no additional setup needed. The more transaction and investment data you have, the more accurate the projections.
📅
20. Financial Calendar
A month grid view of your financial life — see bills, income, and large transactions at a glance with projected recurring events.
1
Navigate to Financial Calendar
Open Calendar from the Finance section of the sidebar, or go to /calendar.
2
Reading the calendar grid
Each day cell shows colour-coded pills: red for expenses and bills, green for income, blue for large or notable transactions. The number of events is shown when a day has many entries.
3
Projected recurring events
The calendar uses your detected recurring transactions to project future bills and income onto upcoming dates, so you can see what's coming even before it happens.
4
Navigate months
Use the arrow buttons to move between months. Click any date to see the full list of transactions for that day.
💡The Financial Calendar is especially useful for bill-heavy months — you can spot payment clusters and plan cash reserves accordingly.
🏅
21. Achievements & Gamification
Earn badges for financial milestones — turning good money habits into a rewarding experience.
1
View your achievements
Navigate to Achievements from the sidebar. Cards are grouped by category: Budgeting, Savings, Investing, Streaks, and Islamic Finance.
2
How achievements unlock
Achievements trigger automatically when you hit milestones — for example, creating your first budget, maintaining a 3-month savings streak, reaching your emergency fund goal, or calculating Zakat.
3
Points and progress
Each achievement awards points. Your total score is shown at the top. Progress bars show how close you are to unlocking achievements that require multiple steps (e.g. "Categorize 100 transactions").
4
Notifications
When you unlock an achievement, a notification appears in the Notification Center (bell icon) with a celebration message.
💡Achievements are designed to encourage healthy financial habits — not just track them. Try to unlock all the badges in each category!
🔔
22. Notification Center
Stay on top of your finances with real-time alerts for achievements, bill reminders, budget warnings, and savings milestones.
1
Find the bell icon
The notification bell is fixed in the top-right corner of every page. A badge shows the count of unread notifications.
2
Notification types
🏆Achievements
New badges unlocked
📋Bill Reminders
Upcoming bills due
⚠️Budget Warnings
Categories nearing or over limit
🎯Milestones
Savings goals progress updates
3
Managing notifications
Click a notification to mark it as read. The unread badge count updates automatically. Notifications are stored locally — they persist across page reloads.
💡Notifications are non-intrusive — they only appear in the bell dropdown, never as pop-ups. Check the bell when you see a badge count.
💡
23. Savings Recommendations
AI-powered analysis of your spending to find unused subscriptions, price increases, and duplicate services you could cancel to save money.
1
Navigate to Savings Recommendations
Open Savings Recommendations from the Planning section of the sidebar, or go to /savings-recommendations.
2
Three detection engines
💤Unused Subscriptions — recurring charges with no recent usage (60+ days inactive)
📈Price Increases — recurring charges where the amount has gone up compared to previous months
👯Duplicate Services — multiple subscriptions in the same category (e.g. two streaming services)
3
Potential savings
Each recommendation shows the estimated monthly and annual savings if you cancel or negotiate. The total potential savings is summarised at the top.
💡Review your savings recommendations monthly — subscriptions you forgot about are the easiest money to save.
🕌
24. Islamic Finance Module
A comprehensive suite of Sharia-compliant financial tools — Zakat calculator, Halal portfolio screening, Sadaqah tracking, and Islamic mortgage monitoring.
1
Enable the module
Go to Settings → Modules and toggle on Islamic Finance. This reveals the Zakat Calculator, Halal Portfolio Assessment, Sadaqah Tracking, and Murabaha pages in your sidebar.
2
Zakat Calculator with Lunar Calendar
The Zakat page shows your assets pre-filled from your financial data, calculates your obligation using the silver Nisab standard, displays the current Hijri date, and tracks your Zakat history year-over-year. A Ramadan mode reminder activates 30 days before Ramadan.
3
Halal Portfolio Screening
Every holding in your portfolio is screened against AAOIFI financial ratios: debt ratio (<33%), interest income (<5%), and haram revenue (<5%). A revenue purification calculator tells you how much to purify from non-compliant earnings.
4
Sadaqah Tracking
Track voluntary charitable giving separately from obligatory Zakat. Sadaqah entries are linked to your Tax Center as deductible donations.
5
Murabaha / Islamic Mortgage
Track diminishing Musharakah financing in the Debt Payoff page. The interface uses "profit rate" instead of "interest," shows ownership percentage progression, and follows Islamic financing structures.
6
Household Zakat Aggregation
If you have a household set up, the Zakat page can aggregate family member assets for a unified Nisab calculation with per-person breakdowns.
💡The Islamic Finance module is completely optional — enable it from Settings → Modules. When disabled, all Islamic finance pages are hidden from the sidebar.
📡
25. Offline & PWA Support
Access your financial data even without internet — recently viewed pages are cached automatically.
1
How it works
GFinTrack uses a service worker that caches pages as you browse. When you lose internet connectivity, cached pages load instantly from your device.
2
Install as an app
On supported browsers (Chrome, Edge, Safari), you can install GFinTrack as a standalone app. Look for the "Install" button in your browser's address bar or menu.
3
Offline fallback
If you navigate to a page that hasn't been cached, a friendly offline page appears with a Retry button. Once your connection is restored, click Retry to load the page normally.
4
Data syncs when online
Any data changes you make while offline will sync automatically when your connection returns. The app uses a stale-while-revalidate strategy — you see cached data immediately while fresh data loads in the background.
💡Visit the pages you use most frequently while online — they'll be available offline automatically. Dashboard, Transactions, and Budgets are great candidates.
🚀
You're all set!
Questions? We're here to help.